svösh Posted September 17, 2004 Author Posted September 17, 2004 Quasimodo jedi Xavier2 are you compiling the game mdl with animations in mdlops to get your first --ascii.mdl to import to gmax ? As far as I know, and I think Cchargin has said at this point new heads or edited heads will not work because mdlops can not export the animations right or maybe even import them right for that matter. I tried with carth’s head last night and the animations get really heavily distorted to the point of being downright scary http://svoshsphotos.fotopic.net/p7608274.html I think your best bet is to make your new texture use shadows to trick the eye to edit your new head and hex edit the .mdl to get it to work . svösh
Xavier2 Posted September 18, 2004 Posted September 18, 2004 Originally posted by svösh [bOk you have to open your pmbbl-ascii.mdl extracted from max in notepad. When the dos prompt stops it will have the exact x y z cord you have to find those exact ones in notepad by hitting Ctrl +F typing the first set of digits [/b] I did as you told me: 1. Mdlops is succsessful in converting, the -ascii.mdl to ascii-bin.mdl; 2. I change the ascii-bin.mdl and ascii-bin.mdx to .mdl and .mdx; 3. put the new .mdl files in the Overrride folder. The armor works fine, but...there is no change to the model. You can see the actual changes i've made in GMAX here: http://img.photobucket.com/albums/v378/Xavier2x/JangoFettarmor9.jpg What am i doing wrong? Xavier2
svösh Posted September 18, 2004 Author Posted September 18, 2004 All of your steps look ok to me. The only thing I would suggest after testing it my self. Instead if renaming your freshly extracted mdl to: whatever name–ascii.mdl I have instead used whatever name -X.mdl the compile worked I think this is better and could help to avoid accidentally compiling with the original decompiled -ascii mdl . svösh
Xavier2 Posted September 18, 2004 Posted September 18, 2004 The interesting thing is that i working right now with the soldier outfit and i'm doing changes far more radical than i did to the heavy armor and i'm happy o say its working absolutely fine:cool: . And that thanks to you Master!!! Thanks again Xavier2;)
Xavier2 Posted September 25, 2004 Posted September 25, 2004 Originally posted by Xavier2 Master svoch Here is another curiosity in the heads modeling effort: http://img.photobucket.com/albums/v378/Xavier2x/Jango_Fettface9.jpg Look its the Jedi Knight Quasímodo from Notredame...bad joke:anvil: In this attempt i was sucessful to resolve the sincronism between the inner head and the blocky head alltogheter. The trade off is that the outer head isn't stucked to the aurora base object (PMHA05). 2 problems resolved, one new problem, and the lips, eyebrow, etc, ain't moving yet. My guess is the the problem is the outer head and its parental relation with objects, since everything else works, but that. If we could figure how to extract it correctly i think sky would be the limit. Xavier2 I succesfully resolved the animation problem. Now the head has all eye, lips., etc movement after edited. One problem remains though. The head is not stucked in the neck. Maybe a new version of mdlops could fix this? If any the creator cares to give it a shot i would be glad to help, provinding information from this attempt. Xavier2
svösh Posted October 15, 2004 Author Posted October 15, 2004 This is both 3dmodeling and Photoshop related and it is very very handy *I recommend this to all skinners, real-time viewing your skin and getting the sacred UV map to make your job easier. * First make sure you have mdlops in your KT dir / To simplify the skinning process first extract the model your using the double click on the mdl only method in kt* [if you have mdlops in the same dir / as KT that is] we aren’t using this model for the game anyways it’s just for “haut couture Modeling” for your skin. If it’s a multi part model weld it all so it is all joined then Go to the modifiers tab [ bent tube ] tab in the right side and click the drop down to get the different modifiers find the unwrap uvw modifier now hit the {EDIT} button and voila the uv map , now hit print screen and paste that in to a new document in ps or psp Now in gmax click the materials editor m on your keyboard now using the eyedropper tool click your model and the default texture should be assigned to the material in slot one. crop it and scale it to the same size as your skin then in ps select the background Hit ctrl + L [levels] and with black eyedroper click the grey background, Now it‘s black and white much better, hit ok . Click the black with the magic wand [ w ] now go to select > similar it should now only have selected the black. Now cut, if the section was good you will be left with what looks like nothing if you have a transparent canvas. Drag that layer to your actual texture document. add it to the top of the layer stack and lock it at 40 or 30 % opacity so you don’t inadvertently do any unwanted editing to it. So now skinning will be a snap and the uv map overlay helps big time. Not to mention skinning In real time with your w.i.p. skin in ps and on the model in gmax you can see the changes Back in 3d and spin the model around in gmax perspective to see how thing are doing and turn on edged faces to see the exact conflicting areas when you get down to that point forget loading up the game 50 + plus time just to test your skin, use gmax to view your skin right after you save it out in ps. Every time you overwrite the .tga file inside the KT dir\ > Works dir\ > your model’s name dir \ To see how thing are taking shape. You may have to update it manually by clicking o the M next to the diffusion box and choosing the path to your texture but after this once it should work by it self every time you make changes and overwrite the .tga in your model’s name dir \ A note for 3dsmax users this is automated just make sure you overwrite the .tga in your KT dir\ > Works dir\ > your model’s name dir \ Happy skinning svösh
Xavier2 Posted October 15, 2004 Posted October 15, 2004 Another great tutorial. I guarantee you folks, Master svosh hinted me on this technique and it reduces the skining time by half.
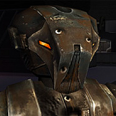
T7nowhere Posted October 30, 2004 Posted October 30, 2004 How I added Helpers to Revans Cutscene model: Ok before I begin I want you to look at 2 pics of models in gmax. The first is of Carth's defualt clothes. Notice the blue boxes, these are helpers/dummy nodes. These can control how the model acts in-game. You can in the pic that Carth has quite a few helpers there in front of the model. Carth Now look at the second pic of Revans in-game stunt model and you can see that this model does not have as many helpers as carths the reason for this is pretty evident. This model was not intended to be use for anything more than the STUNT scene. But as I have said before we are modders and if theres away to do something someone will figure it out. Revan The proccess of adding helpers is fairly easy once you know what to do, but should be set up precisely to match the inimation. We'll Start with the camerahook. camerahook: If you have ever used the Revans cutscene Robes or the ones Im useing for this little tutorial, you will have noticed that when in combat the entire screen moves moves with the player. We don't really want this. So the Camerahook is added to prevent this from happening.So what you need to do is instead of creating and new helper it is more efficient to simply clone one that is there. so the one you want to clone is cutscenedummy. To do this switch to the move and select tool and select the node cutscenedummy hold shift and drag it along the y axis and drop it. now a clone options pop up box will appear this is where you will rename this helper to camerahook(this must be exact) Now with the move and select tool still in use and your new helper selected you want to move it to the correct position. So all you have to do is simply type or paste each coord into the proper axis and you can move onto the next helper. After that you can export your edited model with the new base helpers (DO NOT reset xform or hit fast linker or use the linking tool. By copying the helper from cutscenedummy you new helper will automatically be linked with the Aurora base.) Here is the list of the coords for the 7 helpers that you need to add for any PC model to function properly. when your done your helper layout should look just like carths: camerahook x0.029 y2.068 z163.392 LightsaberHook x-0.374 y75.772 z199.984 DeflectHook x-0.389 y47.311 z200.109 headconjure x-25.554 y21.339 z201.345 impact_bolt x4.01 y41.603 z131.62 handconjure x-6.904 y89.101 z127.381 FreeLookHook x0.0 y12.0 z163.5 Now the second Part of this how I made Revans cape and belt dissapear. It's nothing fancy but in order to keep the model from turning into a monster Instead of deleting the cape I simply added an AuroraTrimesh to the Cape skin and unticked render. Then I hid the cape in the scene and adjusted the the part that was attatched to the cape. I repeated the same steps for the belt aswell. Once I was happy with the changes I exported export the model.
svösh Posted November 7, 2004 Author Posted November 7, 2004 Thanks for sharing T7, an excellent tutorial . Anyone else have tips or techniques they want to add to help others, after all that is what these forums are all about. svösh
svösh Posted November 28, 2004 Author Posted November 28, 2004 Detaching , UVW mapping , and Unwrapping UVW Our example: on a box Create a box convert it to editable mesh by right clicking and choosing convert to..> editable mesh. So your first step is to split your cube up using polygon sub object mode select each part and hit detach [ with to element checked ON in the little window that pops up ] , so the top, bottom , left ,right and front, and back all have mapping cords. Now the next part exit the sub objects and go to edmesh level now in the Modifier drop down choose Uvw map and in the case of a gun box mapping or planar are your best bets Set it to the Z axis and hit fit you should now have a orange box the same height and with as your box or {plane for planar or sphere for spherical or cylinder for cylindrical | The axis varies on the model and the skin } Next we go to the modifier drop down again and chose unwrap uwv Now because our simple cube is split up in to elements we can map this in moments So enter the unwrap uwv subs and select faces . Now select the top of the cube you should see a yellow outline plane [aka your mapping gizmo] showing how the mapping will be applied choosing one of the fallowing axis’s x, y, z, or average normals to map your texture the best way. So in this example [check on ignore backfacing] you select the top and bottom first. On the Z axis hit Planar map button and hit EDIT button now you can see your uvw edit window The section you just mapped is in a free transform gizmo now take this selected part and move off to the left. Now lets make the right and left have the same texture cords so we select both sides holding ctrl + left clicking you can add to your selection. Ok so now with both sides selected the mapping gizmo should be dead center so in th Y axis hit Planar again now move this off to the side in the edit window with enough space so when you go back you don’t accidentally click the wrong part. And do the same for the rest on the X axis for front / back So the way I have just instructed you will have identical textures on opposite sides of your box , some time you don’t want this so in that case just select one side and map one at a time . ok so now there is a border area in the edit window that all of your mapping has to fit back inside, this is the hot zone that the model looks for , select it all and right click chose scale and scale it down to fit you can zoom in make any adjustment you want flip on a mirror axis and use the fast 90 or – 90 rotate tools to make this fit and match up Take a screen shot and paste this in photoshop or psp **see few post up about properly setting up you uv map in a paint program** and get to work make your texture at 512 X 512 , or 256 X 256, or 128 X 128 , or 64 X 64, When saving your . TGA always at 32 bit with alpha channel keep the name under 16 characters or the game will not read it Back in max hit [ M ] get your materials editor and set your shader type to metal , set diffusion to white and to the right of the colour you see a grey empty button , hit this and on the top of the next window dbl click bitmap , set the File type to targa browse for your texture once it’s loaded on the material slot drag and drop the material sphere on to your model below the slots there’s a checkered box button click this to display your texture in the view port or ports that are displaying a smooth shaded model not wire frame. Now take this knowledge and apply to any model you want some uwv mapping settings are better for different shapes ex: saber hilts use cylindrical with caped on swords most often use planar. I most often use planar on masks swords and guns but then again it depends on the model. Happy detaching, uv maping and Unwrapping and skinning svösh
Mono_Giganto Posted November 29, 2004 Posted November 29, 2004 Figures the detailed explanation comes AFTER I solve my problem, right? Just kidding svosh, I'm sure this will help many people UV models.
DarkBladeZZ Posted November 30, 2004 Posted November 30, 2004 Shouldn't we consider adding this thread to the stickies some time in the near future? I mean, since modeling our own stuff has finally become possible (With good results if I may add) then I think it's about time.
ChAiNz.2da Posted November 30, 2004 Posted November 30, 2004 Originally posted by DarkBlade2Z Shouldn't we consider adding this thread to the stickies some time in the near future? I mean, since modeling our own stuff has finally become possible (With good results if I may add) then I think it's about time. I'd second that. Modeling seems to have grown substantially in popularity over the past few weeks (especially with cchargin's lightsaber hilt capability). ::completely off-topic:: DarkBalde2Z your sig always makes me chuckle
DarkBladeZZ Posted November 30, 2004 Posted November 30, 2004 Why thank you ChaiNz, your's is pretty funny as well. Anywho, though I don't think I can 'third' my own idea, I think that there are enough tutorials to make this thread a definite keeper to the board.
Darkkender Posted November 30, 2004 Posted November 30, 2004 Originally posted by DarkBlade2Z Shouldn't we consider adding this thread to the stickies some time in the near future? I mean, since modeling our own stuff has finally become possible (With good results if I may add) then I think it's about time. Refer to this sticky at the top titled Do you Want to mod SW-KotOR? Then Start here.Mod Tutorials! Subsection 3D modeling: first tutorial listed there. I don't think we need a seperate sticky just for this since it is covered pretty well there.
DarkBladeZZ Posted November 30, 2004 Posted November 30, 2004 Hmmm, ok then. Though I still think it's a pretty good idea.
T7nowhere Posted November 30, 2004 Posted November 30, 2004 We have enough stickies right now. Think of "Do you Want to mod SW-KotOR? Then Start here.Mod Tutorials!" as a reference thread For Important modding Threads. Remember IF you think a thread should be added to the list then just PM me.
DarkBladeZZ Posted December 1, 2004 Posted December 1, 2004 Sorry T7, I didn't know. So if in the future this thread becomes important enough to stand out on its own, I'll do that.
svösh Posted December 17, 2004 Author Posted December 17, 2004 Ok back on track basics of Modeling a new saber hilt ** {when in doubt mouse over a button and wait the name will appear} ** Decompile and Import a game model using mdlops to decompile with Animations on. Then use Nwmax import the ascii-.mdl again With animations In max / gmax On the right hand side go to create tab hit first the Arrow icon tab, then click the 2d shape button if it only shows 3d shapes go to the drop down and chose shapes. Click the [ circle square and triangle button ] and choose Ngon below in the Ngon Parameters set the segments to 6 or 8 or 10 or Maximum. 12 sided Ngon click and drag in the top view port. To convert it in to 3d add extrude modifier [ click modify tab it’s the bent tube tab next to create] chose extrude modifier in the long drop down list and below in the extrude modifier parameters set it to 2 cm or so just to make your 2d shape in to 3d. Now with it still selected right click and chose convert to editable mesh or editable poly .. now in the Editable mesh or poly modifier stack, click the plus to expand the sub objects and click on polygon in the perspective view click the top polygon and extrude up. Repeat as necessary while shaping your hilt. Creative license will determine everything else. Try not to make to many horizontal segment it will end up adding to the overall weight of the poly count. It’s also helpful to have an idea before you start of what it is you want to model so you can plan out how high each extrusion should be Using extrude, bevel, move, scale [ uniform or nonunifom ] and rotate in editable POLY / MESH in it’s sub object mode you can make anything you please. If you model as editable poly Make sure to convert to editable mesh before exporting Read the saber tut with mdlops to set your hilt up and fallow the instructions And keep your eye on the poly counter try not to make a hilt over 1000 polys To find the poly counter go to the last tab on the far right side [ utilities / is hammer icon ] in gmax it is already there in 3dsmax you have to add it. So in MAX hit the {add button} [ the button has an icon of 4 button cells on it ] first add two more button slots by setting the number to say 12 or something . Then find Polygon counter in the big drop down list and drag and drop on one of the empty buttons that’s it. Now your counter will always be there unless you reinstall the app. To see the count you have to have the model selected Have a question about terminology read the helpful read me , in fact in my opinion After using various 3d apps and graphic apps I have to say 3dsmax / gmax read-me’s with the database / search function is by far the best I have ever used as well as all great illustrated images. Adobe could take a lesson for this anyways enough rambling go and model and have fun svösh
Recommended Posts
Archived
This topic is now archived and is closed to further replies.